Wednesday, July 28, 2010

Spanish Tapas: Red Onion and Orange Salad


I am dying to go to Spain! Two of my best friends have studied in Seville, Spain in the past year, and I don't think I can take seeing any more pictures or hearing any more stories. I need to go!

As you probably know I spent three weeks this past Spring in Europe, exploring the cities, seeing the sights and eating the food. I was amazed at how different the food and culture could change so dramatically in the seconds it took my train to cross the country borders. The food of Italy was as different from the food of Austria as I imagine it could possibly be.


I am very intrigued about Spanish food after hearing so much about the country from my two best friends. They told me of the wonderful tapas that were served at tapas bars and of the homemade comfort food their "host moms" served them every day at home.


When my first friend came back from Spain she helped me learn how to prepare the Spanish tortilla which I made and fell in love with!

My second friend just got back from Spain last Saturday night and before she even had time to get a good night's sleep her mother was hosting a Spanish themed Welcome Home Party! Every guest was asked to bring a Spanish Tapas to share and I was excited to find a recipe to bring.


I searched online for tapas recipes and decided on this red onion and orange salad. It seemed like the perfect tapas to serve on a hot July day.

The party was a hit and the food was great! My friend's mom made a to-die-for Paella and her dad kept everyone's glass full with Sangria. It was a wonderful party to honor my friend and the beautiful country of Spain!


Red Onion and Orange Salad
4 ripe medium oranges, peeled
1 small red onion, sliced fine
2 tablespoons raspberry vinegar
6 tablespoons extra-virgin olive oil
Salt and freshly ground pepper
4 tablespoons golden raisins, covered for 20 minutes in hot water, then drained
20 black olives, pitted
2 tablespoons sunflower seeds
2 tablespoons almonds, blanched and chopped fine
Springs of fresh mint, to garnish

Remove the white pith from the oranges and cut the fruit crosswise into 1/4 inch slices. Arrange on a serving platter and scatter over the sliced red onion.

In a small bowl, whisk together the vinegar, olive oil, salt, and pepper. Spoon this dressing over the onion and oranges.

Sprinkle with the raisins, olives, sunflower seeds, and almonds. Garnish with mint springs and serve chilled.

Tuesday, July 20, 2010

2010 Lavender Festival


If I had to pick one flavor that defined this summer for me I would undoubtedly choose lavender. Many people don't immediately think of food when they hear the word lavender...but I do. Traditionally lavender is used mostly as a scent, for oils, candles, lotions and deodorants. But when I hear the word lavender I think of all the wonderful things I can eat that are flavored with the wonderful floral taste of lavender.

I can pinpoint the day when my fascination with culinary lavender first began. It was the night when my roommate Heather brought home some lavender truffles from the high-end restaurant where she worked at the time, Jory. These truffles were some of the most decadent things I have ever placed in my mouth. The fragrant lavender blended so well with the creamy and rich dark chocolate.

Willakenzie's booth at the Yamhill lavender festival

Since then I have been on the hunt to find all kinds of culinary applications for lavender. I hit what seemed like the jackpot one day at a Portland Farmers Market when I got to taste and eventually purchase two utterly delicious, yet very different lavender products.


The first product was lavender cheddar from the Rogue Creamery located in Medford Oregon, my absolute favorite local creamery. It was really fun getting to taste lavender being used in a savory application, and it was the perfect combination. The second product that day I got to taste was lavender jam from Sundance Lavender Farm located in Salem Oregon. They produce eight different varieties of lavender jams, but my favorite combination was lavender and blueberry.

While I was visiting Sundance's booth at the Farmers Market I picked up a flier for the 2010 lavender festival (July 10-11th) . Initially I had no idea what the lavender festival was about, but regardless, I knew I had to go. Upon reading the brochure I learned that many different lavender farms around Oregon are opening up for visitors. Many have music, food, crafts, and lavender products to purchase.


The first place I visited the day of the Lavender Festival was the small Lavender Festival located in Yamhill Oregon. This was the only destination on the festival tour route that wasn't located at an actual farm. Instead, many local farms had booths here so that visitors could purchase products from many different farms all in one place.

I looked around the festival, testing a few lotions, smelling a few candles and even buying a bouquet of lavender, but the real reason I was here was to learn about different ways to eat lavender. Much to my delight it wasn't long before I found a food stand selling different lavender goodies. I purchased a lavender lemonade and a lavender scone and was in for a real treat! The lemonade was heavenly, and perfectly thirst quenching on an 80 degree day--I have now decided that lavender and lemon is one of my favorite combinations!  The scone had a delicate but present lavender taste, and was such a treat!

Lavender Scone

I then visited two lavender farms, Wild Rain and Willakenzie. Wild Rain had a great location with a beautiful lavender field and access to the river, but Willakenzie had the culinary products I had been looking for! They sold lavender salt, lavender pepper, lavender sugar, a kit to make lavender simple syrup, and culinary lavender. They also were selling lavender sorbet for the festival, it was very sweet but tasted just right on the hot day.

It was an absolutely perfect day and inspired me to start trying recipes with lavender. In fact, just yesterday I was recipe testing to create a lavender cookie, look for that blog post soon! (Here is the recipe for Lavender Lemon Bars!)

Lavender Sorbet

Here is the lavender simple syrup recipe you can use to sweeten lemonade (or any drink!), pour over a cake or fruit, or use in a sorbet recipe.


Lavender Simple Syrup
From ZoeBakes.com

1 cup granulated sugar
1 cup water
 3 tablespoons dried or fresh lavender flowers


In a sauce pot bring the water, sugar and lavender to a simmer.

Allow to simmer until the sugar is completely dissolved. Turn off heat and let sit until cool. Use or store in the refrigerator for up to a month. The longer you let the lavender steep in the simple syrup the stronger the flavor will be. I store it in the refrigerator with the flowers still in the syrup and strain it when I need it in a recipe.

Attention! The bakery where I work, Sweetest Thing Cupcakes, in Newberg is now offering a lavender cupcake during the month of August! Super yummy!

Wednesday, July 14, 2010

Marvelous Morels


I am a bad blogger. I am on summer break, yet I am blogging less than ever! During the school year I was looking so forward to summer with the hopes of blogging at least once a week. Well, I don't even want to know how long it has been since my last post...


Of course I have an excuse. It's less than two pounds, is black and gold, and goes by the name of Benji. Yes, I got a puppy. And as any proud mommy would boast, he is the cutest, best and most wonderful puppy in the world. His only downfall is that he takes ALL of my time, energy, and money, leaving me with a deserted blog. 
                          

This is not to say that I haven't had some wonderful food experiences this summer. I have. I've made some great recipes, tasted some awesome cuisine, and went to a few great events (all with puppy in-tow), I just haven't had the time or energy to write about them.


One of my favorite things about summer is the bounty of fresh, local produce. I absolutely adore going to farmers markets, finding wonderful treasures and making a spectacular dinner with my finds. 

A few weeks back I hit up one of the Portland Farmers Markets during the week and was surprised what a great selection they had considering I usually visit the large one on Saturdays. I picked up a few things that day, but what I was most excited about were the beautiful morel mushrooms I found. 


I absolutely love the woodsy, nutty flavor of morels and was thrilled to see them at the market for a reasonable price. I have always had the dream of hunting morels after reading The Omnivores Dilemma. However, I hear that this is quite difficult and somewhat dangerous so I have decided that for now hunting them out at the market is good enough for me.


The stand we purchased these morels at generously provided free recipe sheets to customers. I picked up a few and was delighted to see one for simple sauteed morels and asparagus--I had asparagus in the fridge just waiting for a great recipe!

The morels sauteed up beautifully and tasted heavenly with a little butter and shallots. I didn't want to detract the focus from the morels so I served them alongside al dente spaghetti tossed with a little olive oil, fresh basil and a sprinkling of Fusion Thai ginger sea salt. It was an awesome combination and I cannot tell you how satisfying and memorable this simple meal was! If you cannot find fresh morels dried ones can be found at the supermarket and then re-hydrated in some water.


Asparagus and Morels
Recipe courtesy of the mushroom stand at the Farmers Market, whose name I can't remember :)

1/2 lb fresh morels, sliced lengthwise
2 tablespoons butter
2 bunches asparagus, cut into 1 inch pieces
1 shallot, chopped
2 cloves garlic, minced

Melt the butter in a skillet over medium heat. Add the shallot pieces, garlic, morels, and asparagus. Cook until morels are browned and the asparagus is tender, usually 8 to 10 minutes.

Sunday, June 20, 2010

Pecan and Almond Chocolate Toffee


Would you like to know the story of how I become a food blogger?

A little over a year ago I was spending a few days in Disneyland and California Adventure with my family. Sure, I was thrilled about going on rides and meeting Minnie Mouse, but the biggest reason I was excited this year was because we would be there during the California Food and Wine Festival! 


A few months before, my dad signed my mom and I up for a cooking demonstration titled "Sweet Sundays" (my dad is great! Happy Fathers Day Dad!). The demonstration was put on by Matt Lewis and Renato Poliafito, owners of Baked Bakery in Brooklyn, New York. 

After a fabulous brunch the audience was educated and entertained by these two master-bakers as they showed how to make some of their most popular and favorite recipes. My favorite recipe they made that day was their peanut butter chocolate bars, which I will definitely blog about soon! 


After the demonstration I had to go right out and purchase their cookbook. I desperately wanted the recipes, but I also wanted their autographs. There is just something about getting a personalized autographed cookbook that makes it TEN TIMES better! 


While they were autographing my cookbook somehow the subject of my fascination with food came up (Ok, who are we kidding, I'm sure my mom blurted it out!). Anyway, they asked me what I wanted to do with a "food and nutrition in business" degree. I told them I had no clue, but I wouldn't change my major for anything, I LOVE FOOD!


Out of the blue one of them said "I think you should be a food blogger"! (Um, excuse me, is that even a real career?) He then proceeded to tell me about how food blogging was the new big thing in the food world (yes, this was even before Julie and Julia came out), and that there were a lot of great food blogs out there. 


Next, he wrote down the name of four of his favorite food blogs for me to go to (David Lebovitz, The Amateur Gourmet, Smitten Kitchen and Orangette). In fact, I still have that piece of paper!

Now, you would think that divine inspiration like that would prompt me to start blogging the moment my plane landed back down in Portland. Wrong, I waited almost nine months before I started my blog. But I haven't looked back since. 


This pecan almond chocolate toffee recipe was from their cookbook I purchased that day. I made it on a whim a few weeks ago to bring to a friend's birthday celebration. After one taste I knew it was a keeper recipe. This toffee tastes just like Almond Roca--only better! 


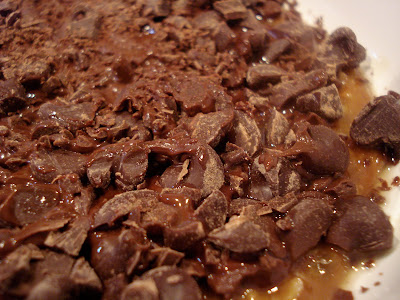
This recipe is a lot easier than most toffee recipes because you do not have to temper the chocolate. You just chop the chocolate and spread on top of the hot candy layer, and viola! it melts perfectly. I ended up only making a half-batch because I did not have enough pecans and almonds for a full batch, but trust me, you will want to make a full batch--and even then it will be gone too soon!


Pecan and Almond Chocolate Toffee
From Baked
1 cup sliced almonds
1 cup toasted pecans
1 cup (2 sticks) unsalted butter, cut into 1-inch pieces
1 cup sugar
5 ounces dark chocolate (60 to 72% cacao), coarsely chopped
4 ounces milk chocolate, coarsely chopped

Butter a 9 by 13 by 2 inch glass or metal baking pan (do not use nonstick spray)

In the bowl of a food processor, pulse the almonds until they are a fine powder. Place the powdered almonds in a small bowl and set aside. In the same food processor bowl, pulse the pecans for just 1 or 2 seconds, or until they are coarsely chopped by not powdered. Set aside.

Put the butter in a medium pan over low heat. When the butter is halfway melted, add the sugar and 1 tablespoon water and cook over low heat, stirring very gently with a silicone or rubber spatula, until completely combined. Clip a candy thermometer onto the side of the pan, turn the heat up to medium-high, and wait for the mixture to reach 300 degrees F., about 15 minutes. The mixture will start to bubble and turn brown. If the browning seems uneven, swirl the pan during the cooking process but do not stir.

Meanwhile, toss the dark and milk chocolate pieces together.

When the mixture reaches 300 degrees F., remove the pan from the heat and remove the candy thermometer. Stir in the pecan pieces and pour the mixture into the prepared pan. After the mixture has evened out in the pan, wait 1 minute, then sprinkle the chocolate pieces all over the toffee. Wait about 3 minutes for the chocolate to melt, then use an offset spatula to spread the chocolate into an even layer. Sprinkle the almond powder over the melted chocolate, then carefully put the whole pan in the freezer for about 30 minutes.

Remove the pan from the freezer and break the toffee into pieces with a sharp knife. Store the toffee, between layers of parchment, in an airtight container at room temperature.

The toffee will keep for up to 5 days.

Yield: 1 1/2 pounds

Tuesday, June 15, 2010

The Food of France


"I have unfinished business with Paris."

This is what I keep telling everyone who asks me how I liked Paris and how I liked the food I ate there. There are two main reasons I say this: first, because we only spent four days in Paris and two were completely filled with going to the Normandy beaches and the Versailles gardens. And second: when I actually WAS in Paris one of our group dinners was at the Hard Rock Cafe (to make myself feel a little less guilty I ordered the Paris Burger), and our very last dinner in Paris--and our last dinner of our whole trip--was at an Italian Restaurant! After spending a week and a half in Italy, we eat our last meal at an Italian Restaurant!

Delicious Raspberry Macaroon

So now you can see why I have unfinished business with Paris. I didn't get to visit a single place from the 15 pages I printed of "Where to Eat in Paris", or David Lebovitz's book, The Sweet Life in Paris (which I diligently read during flights and train rides proceeding Paris).

REAL French Creme Brulee

With all that said, I would like to tell you that I DID have good food in Paris, just not as much as I would have liked.

After some pretty dreary weather in Austria and Germany I was ecstatic when we got off the train in Paris, a city I have dreamed of visiting since I was a child, and it was sunny! That first night our whole group headed to Rue Claire for dinner. It was just around the corner from our hotel (which was also just around the corner from the Eiffel Tower!). The street was simply precious with tons of restaurants, bakeries, specialty food and wine stores, and produce markets. Now this is why I came on this trip!

Places to go on Rue Claire

I did stumble across a few wonderful cafes and bakeries in France but honestly one of my favorite wasn't even in Paris at all! It was in a small town on the northern coast of France, near Normandy beaches, called Sainte Mere Eglise.


I stumbled upon Le Fournil while scoping out a good place to have lunch. Many students from our group were going to have lunch at a hamburger stand nearby. Disappointing and disgusted, I went in search of a "more French" place (these students reported that it was the worst burger of their life, and subsequently came and had a second lunch at the place I picked out!).


After this good lunch we walked outside and discovered Le Fournil across the street. I had to go in. After looking around in astonishment at my dream French Bakery I decided to buy a small white chocolate and raspberry mouse cake (pictured above). I was so caught up in the moment that I took it to go eat outside and forgot a fork! I ended up eating it with my hands like a barbarian--it also didn't help that I was moaning and muttering "this...is...so...good" between mouthfuls of moist cake. 

I was so impressed with my cake that I had to make a second trip into the patisserie to buy something I could take home. My friends told me I probably didn't have enough time and might miss our bus, but this was worth it! I grabbed the first thing I saw that was packaged and paid for it--a small bag of tiny orange candies which I am eating right now!


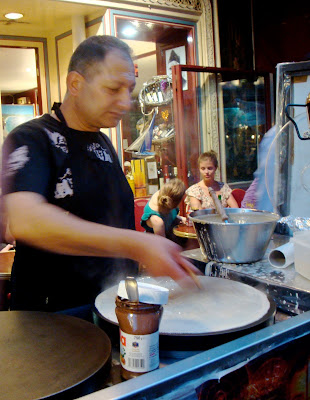
Many people go to Paris with high expectations for delicious crepes. My first crepe--with nutella--was purchased at a small crepe shop right next door to the Moulin Rouge. But my favorite crepe place was also found on Rue Claire. 


I had heard several girls on my trip mention that they had frequented a crepe cart around the corner so many times that the man now knew their names. On our last night in Paris--after the depressing Italian dinner experience--I knew I needed a crepe. I went with a group of students to this stand. I ordered one of the most simple crepes you can get, cinnamon sugar with butter. I took so many pictures of the crepe man in action that he pretty much offered to apprentice me! I should have taken him up on the offer!


If I had to pick my favorite meal I had in Paris, I would say it was the very last meal I ate there before heading to the Paris airport to fly back home to Portland. I had gotten up early that morning to make sure I was packed and ready to go. I had a little extra time so I decided to wander in search  of a good breakfast. 


I discovered a boulangerie and patisserie directly across the street that I had never noticed before, J.M. Bretteau. I went inside and picked out a heavenly-looking almond croissant. Just thinking of it now is making my mouth water. It was the best pastry I have EVER put into my mouth.


To go with my croissant I went to a fruit stand and purchased a small container of raspberries and some fresh squeezed orange juice. It was such a humble breakfast, and couldn't have cost me more than 7 euros, but like I said, it was the best meal I had in Paris. It was so bittersweet, too, because it was also my last meal of my three week long trip.

Well, this concludes my blog posts about my awesome European trip. It was an experience of a lifetime and I really hope I am blessed enough to have the opportunity to go back again soon--especially to Paris! I made wonderful memories, met people from all over world, took about 2,000 pictures, spent about $300 on souvenirs and ate about 63 meals (with countless snacks and desserts). Just thinking about it now is making me hungry! I think I'll go make myself a crepe....Au Revoir!